If you ever wondered what’s the correct way to do your payroll bookkeeping this article is for you. We’ll go over in detail what to do to do it the right way. This will be helpful to you whether you run payroll for actual employees or just for yourself as a de facto employee. If you’re more of a visual learner here’s a video outline of the whole process.
You might have come across payroll transactions in your bookkeeping software. If you do your own books, did you know how to handle those? If you’re not a trained accountant, chances are you didn’t, but using this information you’ll be on your way there. Here’s a screenshot of how it might look:
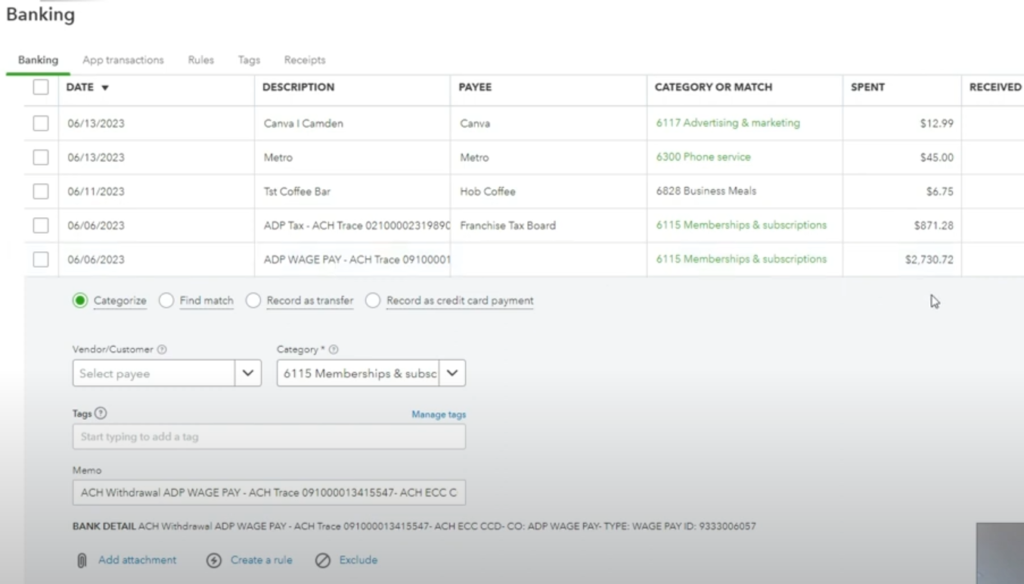
This is Quickbooks Online’s bank feed. That’s typically what you’re going to see when you connect a bank to Quickbooks Online bookkeeping software.
Notice the two transactions from ADP, one of the major payroll processors. The one that says “Wage Pay” is the net wage payed to the employee. The one that says “Tax” is the total tax remitted to the federal and state tax agencies.
The question once again becomes, how do I classify these transactions? We’ll have to dive deeper into some of the payroll reports in order to do the payroll bookkeeping right.
The Payroll Liability and Payroll Detail Reports
In this article, I’ll be relying on Quickbooks Online and ADP since that’s what the example is based on. If you use other kind of softwares for bookkeeping and payroll, it’s likely going to be quite similar.
First, go to your payroll processor’s reports and look for some of the key reports with the main information. In the case of ADP, these will be the “Payroll Detail Summary” and the “Payroll Liability Summary” reports. Select the report period by “Check Date” or the appropriate time period. In the example we starting with above, we’ll pull up the June 7th check report. Verify if the report matches the info for the transactions in question.
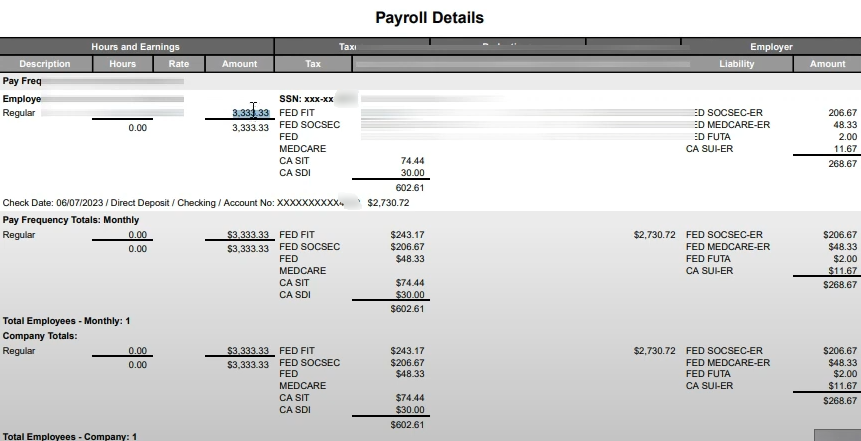
What won’t be obvious as you look at your bank feed is that whatever wages were payed were not the employee’s total wages. That’s because you as an employer will withhold the part of their wages that go toward taxes. Continuing with our example, we can see in the Payroll Details Report that total wages to the employee were $3,333.33. However, only $2,730.72 were deposited to the employee’s account after the withholdings. Keep this in mind as we go through some more of the steps in the process.
Making Sense of Payroll Liabilities
Next let’s look at the payroll liabilities report. You’ll notice from this report that beyond the $3,333.33 pay to the employee (net pay plus withholdings), there’s additional money being charged.

That additional amount represents the employer’s contribution to payroll taxes. It will be included within the $871.28 along with the withholdings from the employee.
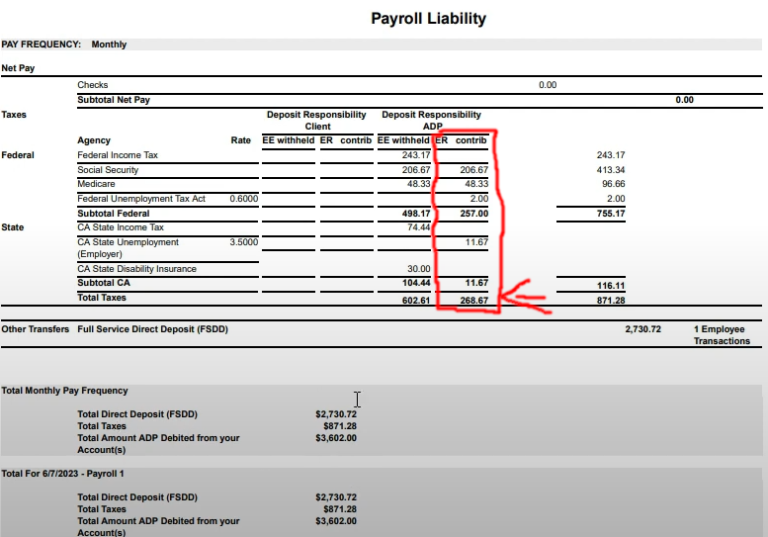
Here’s another part of the Payroll Liabilities Summary Report where we can really see a breakdown of the taxes being charged.

Here we can see the employer’s contributions under the column “ER contrib.” At the bottom line of the ER contrib column we see the total employer contribution at $268.67. To make better sense of this, if we take the total amount taken for the payroll, $3,602, and subtract the total wage pay, $3,333,33, we will get the same amount of ER contribution of $268.67. That’s because within the $871.28 payment we’re already remitting the employee’s withheld portion of taxes, plus $268.67 of our side of employer contribution will give us the total payroll taxes.
So, again, the $602.61 withheld from the employee plus the $268.67 employer contribution will get us $871.28. And then we count the $2,730.72 of the net employee payment and we arrive at the total amount taken for the payroll of $3,602.
A Journal Entry Will Help You to Account for Payroll Liabilities
In order to “do it right” as far as your payroll bookkeeping, you’ll need to create a journal entry. A journal entry in simply an entry of transactions you make into your accounting. It allows you a great amount of flexibility to express accounting entries. Journal entries are, however, one of the top sources of trouble because of the same reason –too much freedom! Therefore you should be careful to get it right.
“Debits” go on the left column and “credits” go in the right column. At the bottom of each of those columns you’ll see a total for debits and credits. For the journal entry to be valid, the total debits and credits shown in the bottom must equal each other.
Credits will increase liability (what you owe people, in this case the IRS and state taxing authority) accounts, while debits will increase expense accounts (such as “Wage Expense,” or “Payroll Tax Expense”).
Creating The Journal Entry
On your Quickbooks Online dashboard, you’ll see on the left-hand side a bar with different buttons. On the very top of the bar, click on the “+ New” button. Then select “Journal Entry.”
Input the date that the check was run as per your payroll report for the journal entry. Now, we can start to plug in all the different payroll liabilities into the JE.
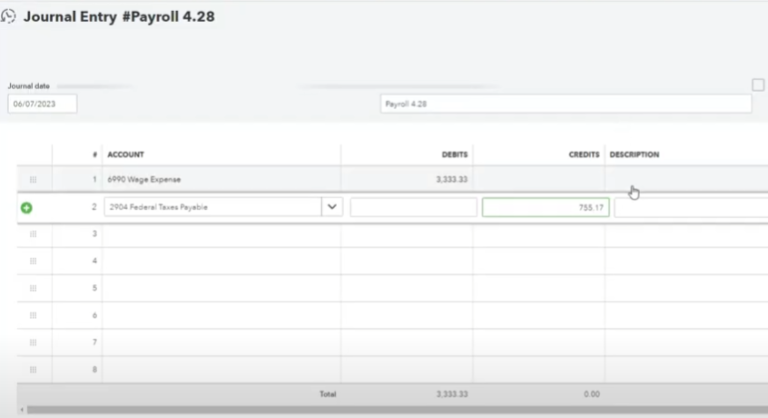
We’ll start off by plugging in the “Wage Expense” [Expense Account] for the total $3,333.33 wage to the employee. Then we’ll take the federal taxes and put them into “Federal Taxes Payable” [Liability Acct.] Here’s a screenshot of all that counts as Federal Taxes:
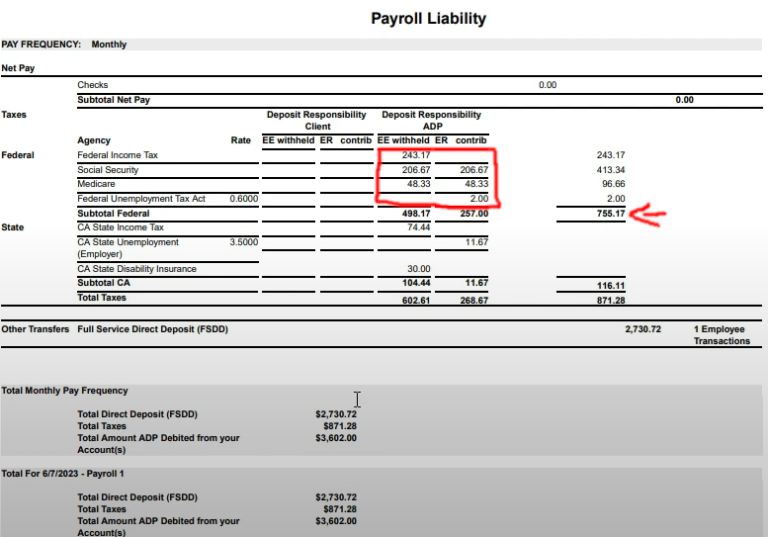
When you add up all the federal taxes, including employee withholdings and employer contributions, you get $755.17.
Then we go to the state income taxes, state unemployment, and in this case the CA state disability insurance. All of them will be liability accounts.

Notice again that expense accounts are plugged in as debits, while liability accounts are plugged in as credits.
And then we’ll plug in the employee’s net pay as “Wages Payable” [Liability Acct.] as well as the total of the employer contributions as “Payroll Tax Expense” [Expense Acct.]
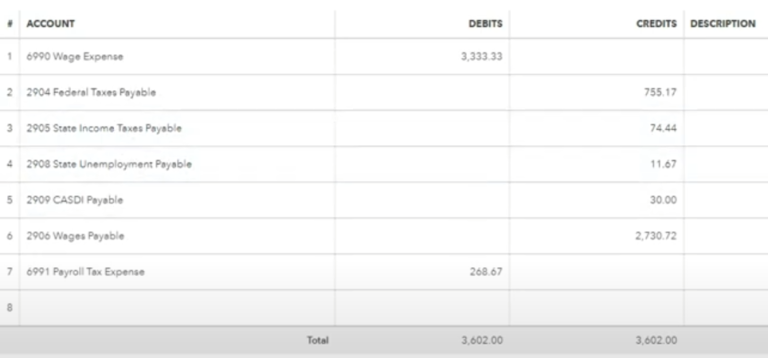
Notice how the total debits and credits at the bottom are equal to each other. This is one of the checks that will alert you you’re on the right track. Also note how the “Payroll Tax Expense” equals the total of the employer’s contribution column, as illustrated in the following screenshot:
Now you can hit “Save and Close” on the JE to make sure it’s recorded. Hurray! But hold your horses. We still have one more tiny step to go. Back full circle to the Quickbooks bank feed.
Reconciling The Payroll Liabilities Journal Entry With the Bank Feed
The last step to go in our payroll odyssey *wink* is to reconcile what we did in the JE (journal entry) with the QBO bank feed. We’ll go back there and we’ll take care of the easier one first. Take the $2,730.72 transaction and classify it as “Wages Payable.” This will reduce the “Wages Payable” account back to zero, as it should.
After that, you’ll go to the $871.28 transaction and click on the button “Split.” Then, you’ll create lines for each of the payroll liabilities from the JE and plug in the exact amounts as there recorded. When you’re done, if you’ve done it right, you should see at the very bottom a red $0.
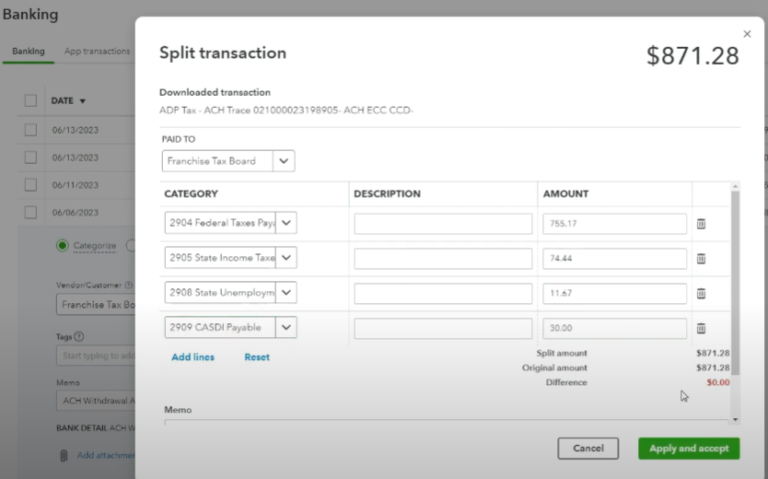
Now that wasn’t too bad was it? Mmm maybe it was! Realistically you might want to hire an accountant to do this. Or at least to check periodically if everything has been done right.
How to Check If You've "Done it Right"?
“One more thing” as Uncle Chan used to say. You should do an additional check to see if you’ve “done it right.” Within Quickbooks, on the left bar towards the bottom, go to “Reports.” Then, click on the “Balance Sheet” report and have the ending date as the check date for the payroll. Hit “Run Report.”
Go down and check on “Current Liabilities” where the payroll liabilities should be. Check to see if after doing this they’ve gone down to zero. They should do so unless you had liabilities from previous periods still there. If you did have them, check to see if the number has gone back to what it was before any of the payroll procedure.
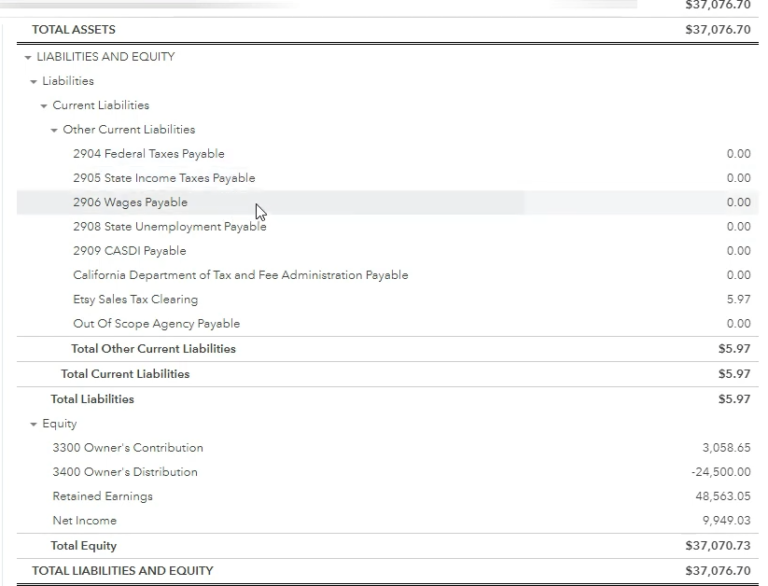
For an additional aid in this process, take a look at the video below, and feel free to contact us as well if you’d like more assistance with this.
Also, if you’d like to look at a slightly more automated process to get your payroll bookkeeping done, check out this article. You can also follow along this video to better understand this secondary automated methodology.


Pingback: How to Automate Your Bookkeeping and Payroll